Showing posts with label Brisbane screen-printing class. Show all posts

Friday, 13 April 2012

April Fabric Printing Class

Here are some highlights from our 2-day class earlier this week.

Cameras in repeat become a cool fabric design.

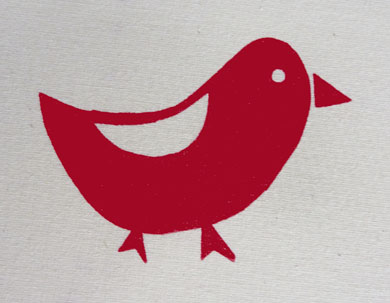
Camera design by Kate Perry of Red Chalk. See previous post too.

This is Kate screen-printing yardage with me. Perfect pass of the squeegie!

Eiffel Tower design by Kelli Grennan of See-Saw Illustration & Design

This is Kelli about to take over the screen-printing.

Cute screen-prints by Sophie Farquhar of Bed Toppings.

This is Ellen Stapleton's screen-print. Unfortunately, Ellen didn't make it back for day 2 so we didn't get a photo of her :( But you catch her and her amazing art work on Ellen Stapleton Art & Design.

Screen print by Nicola Duncan of Make Space.

Nicola and Sophie cutting out stencils.

Screen printed design by Helen Vickers.

Helen & Nicola.

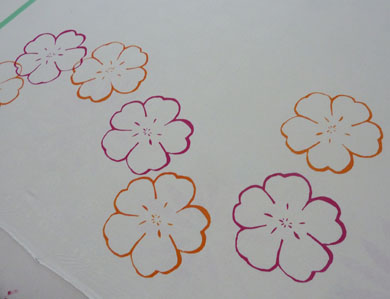
Setting up the new Floribunda design: the screen is printed once on the fabric, the design positive is then lined up next to that (dry) print. This where the next screen will then be printed. We measure the distance and that's the repeat width for that fabric print.

10 metres of hand-printed yardage. Well done ladies and thank you for coming to our class!

Monday, 10 October 2011

The Last Workshop

As you know, Saturday was my last screen-printing workshop. It was timely with dwindling numbers of late. However, after teaching for just over 4 years, I am looking forward to concentrating on new and exciting things. Thank you to the two lovely ladies who did come along.

I never tire of overlapping prints in pretty colours. Butterflies print by Selina Zwolsman.

This is Selina blow-drying her many insect screen-prints.

Jenny Gilshenan travelled all the way from Hervey Bay for the class and was pleased to put these lovely shapes into print; she had been doodling them for years. Do you doodle the same thing over and over? I know that I do.

Here's Jenny with variations on her screen-printed design.

If you do want to learn how to screen-print next year, I will consider teaching if you organise your own group of 5-6 people. Contact me for more information.

I have to finish painting my living room today because it's Project Monday. I can see the end in sight!

Tuesday, 19 July 2011

July Screen Printers

I'm preparing to fly to Melbourne this morning for the design fairs that are on this week so things have been a little hectic around here.

I'll be staying with Elessa, that rebel girl, for the last time in the great southern city as she is moving back to Brisbane in a few weeks. I'm one happy mamma bird!


Speaking of birds, I have some images to share with you from last Saturday's Screen-Printing Class.

These are printed by Robyn Talbot.

This is Robyn.

I always encourage participants to try out different design ideas. I love Robyn's boxed floral print and purple is one of my favourite colours.

Donna Irvine printed a bird in a cage.

Birds in cages bother me so I was happier to see the bird without the cage

or the cage without a bird. With 2 different screens, you can have 3 designs as Donna has.

This is Donna. Our class was a happy meeting place as it turned out that Robyn and Donna knew each other from their Brownie days at the tender age of 7 and living in Bundaberg. How cool is that? I can't believe that they recognized each other after so long.

Donna has an on-line business called Hamptons Style that you can like on facebook. The cutlery is so cute. I love the hand-cut look of it.

And last but not least, Karen Deyes joined us all the way from Lismore. It was a fun intimate group.

Karen's orange flowers

joined by pink flowers creating such a lovely tropical design.

Our next screen-printing class is on Saturday, 3rd September. To make it easier for you to secure your place, you now only need pay a 50% deposit when booking on-line with the balance due 2 weeks before the class.

We will also be hosting another Open Studio Day next month. Date to be announced soon.

Saturday, 25 June 2011

Proud to be Cheap

The fabric sale continues! The Peacock Party design hand-printed on hemp/organic cotton has now been added to the clearance range.

There is limited stock of the Teal, Red and Orange print and I expect this one to go quickly. It would look great as cushions, don't you think?

Keep checking our Sales Page for other bargains including 20% off the July 16 Screen-Printing class until the end of the month.

The husband and I are going out to breakfast this morning but I will be in the Studio Shop later if you wish to pop in and shop direct.

Wednesday, 13 April 2011

I Can Teach You

It must bring every mother joy when their child (big or small) finally takes an interest in what they are doing.

I taught my son Val to screen-print yesterday and he was stoked when he printed this t-shirt and now wants to do more.

This is a big deal as my boy has never been arty or creative having studied Computer Science and Commerce at university and learning to play Chess at the age of 4. So with confidence, I can say that I can teach anybody to screen-print!


I figured that with the extra studio space we now have, we could accept 6 people for our new Screen-Printing Workshops (instead of 5) providing that I have a studio assistant to help.

Val will be our friendly assistant for this weekend's class and was quite obliging when I told him he would be surrounded by 6 lovely ladies (plus me). I will be posting images of the workshop after Saturday.

I'm taking a break from classes in May but have scheduled one for June and July. Book directly on-line if you wish to join us.

Sunday, 20 March 2011

Time Not Wasted?

There are definitely better ways to spend a Sunday morning but this is what I did today.

Tying hang tags is pretty boring, right? However, when the alternative is to sit in a chair in a hospital doing nothing, it seemed like a good way to manage my time while visiting.

Yep, the man is back in hospital. This leg infection is pretty stubborn and keeps returning to the scene of the crime. Friday night was a terrible time and I had to call the ambulance for help and poor Voyt was rushed to the emergency department.

I felt pretty helpless as I did have to teach a screen-printing class yesterday. As I had already postponed once before, I did not want to disappoint my lovely ladies again.

Let's just hope that the man behaves and stays put this time. He is harassing the doctor for a "pass out" for Thursday night to attend the Santana concert which is why I was under strict instructions to bring these crutches to him. The doctor is not making any promises. C'est la vie.

I promise that my next post will be a more positive one with images from yesterday's screen-printing workshop.

Wednesday, 9 March 2011

One Down and One To Go

We're physically exhausted and only one table has been set up! The truth is that we have had to move things around (several times) to best fit the space and to avoid the leaks. It's worth it though as I'm finally beginning to like this studio.

Here is the 7 metre table (our baby). Solid wood panels have been screwed into the top of the steel frame.

Next came the 8 mm thick industrial felt on top of the wooden base. Felt underlay allows for consistently better fabric printing than screen printing onto a hard surface, especially when using large screens which may be slightly warped.

Voyt's looking quite pleased with our efforts. Poor dear has been working hard with a support stocking on his healing leg.

Dan continues to impress us with his skills. He even brought his own air compressor to work!

The air-propelled staple gun was so easy to use for stapling the felt and then the canvas drop cloth into place over that. I even had a turn with it and didn't want to give it back.

Table 1 is now ready for a new era of screen-printing. I forgot to take a photo of the registration bar that went on last. That was the hardest part. My son helped us today too so the four of us had to lift it into place.

Finally, Dan went around the whole table with a spirit level to make sure that is was all perfectly flat ready for yardage printing! This is where adjustable feet come in handy.

Anybody that reads this blog will know how I hate throwing out anything that can be repurposed so I will be cutting up the old printed drop cloth to hang some unique artwork in the house and office. I'm not sure which bits I will be using yet as there are 7 metres to choose from!

I will show you once it's done and if you like it, I will sell off the rest. If you have done a screen-printing workshop in the past, we may be able to find your little bit of history here.

We are all having a wee break from studio set up tomorrow before taking delivery of the remainder of the 12 metre yardage-printing table on Friday. I'm not looking forward to assembling that but it will be great when we can print several metres at a time!

There's still much unpacking and cleaning involved so I've decided to postpone this weekend's workshop until next Saturday the 19th.

Since a couple of the participants have moved over to the April class, there are now places available in both classes. If you would like to join us, please book directly on-line. You may view previous screen printing class images here.

Monday, 10 January 2011

How to Use Rubylith

Today, I'm going to show you how you can use Rubylith, a type of masking film, to create a positive for exposing your image onto a screen for fabric printing.

The positive that I have created here is for our new "French Stripes" design. I first laid out a paper guide onto my light table and then secured the Rubylith over it. Before you do that, cut the Rubylith to the size you need for your screen.

It is important that you place the side that can be cut away upwards. Here is a description of the process on e-How.


I first scored the Rubylith with a craft knife in long rectangles in between my dark guiding lines - the red that remains is what becomes your film positive. Be very careful when cutting as it is easy to cut through both layers - the red and the supporting transparent backing. Use gentle pressure and a sharp blade.

Use your craft knife to gently lift up the corner of your cut area so you can easily peel it away.

It is so much fun peeling away the layers that you don't need to slowly reveal your design. If you make a mistake you can use sticky tape to stick the Rubylith back in place.

This is my finished positive for the "French Stripes". It was the perfect method for this design as I wanted the lines to look very organic and not cut in perfect straight lines.

I love using Rubylith but had forgotten all about its existence as it isn't so easy to find in these days of digital design. It wasn't until my recent visit to Anne Leon's studio that I was reminded of it.

It is difficult to obtain in small quantities as most suppliers expect you to buy a 25 metre roll. However, I was able to source it from
Artmart Australia who will sell it to you by the metre. You will find world-wide distributors here.

If you want to learn more, I do an overview of the different methods of creating a film positive in my Screen-Printing classes.

My dog has absolutely nothing to do with using Rubylith but her image me smile when I found it in the same group of photos. Zoe (my pet) and I both wish you a great week even though Queenslanders will be swimming to work. Enough rain already!
Related Posts with Thumbnails